
Do you have to quickly develop a strategy to test your students in a virtual environment? We have your back! WebAssign features a wide range of testing restrictions that allow you to create an assessment or turn any assignment into a quiz, test or even high stakes exam.
Keep reading to learn how to create your quiz, test or assessment and optimize your settings for student success.
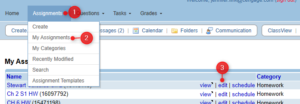
1. Create an Assignment Category for Quizzes and/or Tests
By setting your assignment category and choosing a template, you’ll be able to have predetermined settings you can apply to any new test or quiz you create.
WebAssign’s default Assignment Templates for quizzes, tests and exams allow students fewer submission attempts than homework assignments and disable learning tools like eBook links and videos until after the due date.
2. Create Your Test and Questions
There are a variety of ways you can create quizzes and tests within WebAssign. You can create a custom test with all new questions, use a pre-built assessment included in your textbook’s Course Packs or convert an existing assignment into a test format. Let’s break down each approach so you can see how they work:
Create a New Test with all New Questions
This option takes the most amount of time, but it gives you the opportunity to individually select each question you’d like to include in your test. If you’d like to create a new custom assessment, follow these steps:
- Create a new assignment and under Assignment Settings, select your test template identified in step 1.
- Find your questions – through the question browser or by creating your own.
- Add your questions to the test.
Use a Pre-built Assessment from Your Course Packs
Course Packs are a set of pre-built assignments available with most textbooks. Find and download your Course Packs from your Class schedule page, and choose the assessment you’d like to use.
WebAssign Tip: You can preview assignments in your Course Packs by clicking on them.
Convert an Existing Assignment into a Test
 In the Assignment Editor mode, you can quickly turn your assignment into a test or quiz by editing the category under Assignment Templates. Simply select from one of our predefined default testing templates or create your own.
3. Customize Your Test Settings
You can further refine your exam template to customize the testing experience with a variety of different settings. Things to consider:
- Do you want your students to submit the entire assessment at once to better simulate an on-campus exam? If so, you can easily do this by navigating to Submissions and Work and using the Submitting Answers drop-down to select ‘Assignment,’ meaning all answers for the assignment will be submitted at once.
- Do you want to scramble the order of the questions on the assessment for each student? If so, under Assignment Display, select Random from the Question Order drop-down.
- Do you want students to immediately know if they got each question right or wrong? Consider configuring correct/incorrect marks under Learning Tools so it only displays after the test due date.
- Do you want to review students’ work as part of the test? Enable Show My Work either for all the questions on the assignment, or for specific questions. Marking Show My Work as required will let you manually add (or subtract) points based on the student’s detailed submission.
WebAssign Tip: If you’ve decided to customize one of WebAssign’s default templates or create your own, make sure to save the template for your personal use later or to apply it to any other assignments that you want to use as a test!
4. Configure Assignment/Testing Restrictions
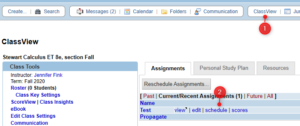 Once you’ve configured all the settings in the Assignment Template for your assessments, you can apply the testing restrictions to the assignment on your Schedule page. Follow these steps:
- Identify the assignment that you want to apply the restrictions to from your ClassView page and select the schedule option next to it.
- You’ll be taken to the Schedule page for that specific assignment.
- Click the blue action menu icon next to the assignment name and select ‘Edit Restrictions’ from the menu.
Available Restrictions
You can choose any of these restrictions, or choose multiple restrictions, on any assignment:
- Schedule a Timed Assignment: Give your students a specific amount of time to complete an assignment. If your students are working on the assignment when the time expires, all their responses are automatically submitted so they do not miss any points. After the time has expired, your students cannot do any more work on the assignment.
- Password Protect an Assignment: Students can only begin working on an assignment once you tell them the password. This restriction is ideal for ensuring all students are taking the test at the same time.
- Schedule a LockDown Browser Restricted Assignment: To help prevent cheating, you can restrict your students’ computer activities while they are working on a quiz or test by requiring that the assignment be opened in the free WebAssign LockDown Browser®. While an assignment is open in LockDown Browser, your students cannot use instant messaging, search the Internet, print, copy text, or use other applications on their computer. Note: students must download and install LockDown Browser before they begin the test, so it is recommended you schedule a practice assignment so students can test their system to avoid additional testing anxiety.
- IP Restrict an Assignment: You can restrict any assignment so students are required to use a specific set of IP addresses to access it. This restriction is ideal of exams delivered in a proctored environment, or for students required to use institutional devices from home.
Looking for More Tips?
Transitioning to a virtual or hybrid course especially mid semester can be stressful – let us help! Keep in mind the following resources that are available to you.
- Search WebAssign Help for step-by-step how to’s and tutorials
- Follow us on social media for timely WebAssign best practices & tips
- Twitter.com/WebAssign
- Facebook.com/WebAssign
- Has COVID-19 affected your school? Find out how Cengage can help.