Author: Corinne Hoisington, Professor of Information Systems Technology, Central Virginia Community College
Group projects are ideal for adding a professional feel to your class, helping students connect with one another, and providing real-life working experience with distributed teams. But as educators we have all worked with student groups who were not organized in establishing tasks, a timeline, and the follow-through for finishing their assigned part. Microsoft Planner will not only assist groups in organizing their project, but also provide more experience in how businesses conduct modern project management.
Microsoft Planner is a project planning application available on the Microsoft 365 platform. The application is available to premium, business, and educational subscribers to Microsoft 365. Microsoft Planner offers a visual way to track and manage projects and other work among student and business teams.

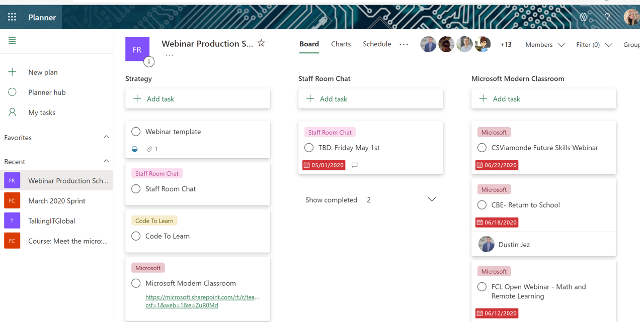
Available on the web and as a mobile app, Planner serves as a hub where all team members can create business plans and organize tasks so that other members can view and access them. As shown in Figure 1, each member of the team can be assigned a task and share their completion of that task with the group.
To get started with Microsoft Planner, log in to Office.com and click the Planner app.
Step 1: Create a New Plan and Group
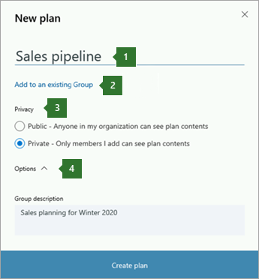
- Start a new plan by choosing “New Plan.”
- Pick a name for your plan e.g., “Group Project.”
- Choose whether to create a new group or add your plan to an existing group (see the next set of steps).
- Choose who can see your plan. Public plans are visible to everyone in your organization. Private plans are only visible to people you have added to the plan. When people in your organization search for plans, only public plans come up in search results.
- Select “Options” to add a description.
- Select “Create plan.”

Step 2: Add Tasks to a Plan
- Enter a task name in the box under “To do” and then choose “Add task.”
- When the task is completed, each member of the team can mark their progress.
- After adding tasks, you can sort them into buckets to help break things up into phases, types of work, departments, or whatever makes the most sense for your plan. A bucket is a group of categorized tasks.
Step 3: Visualize your Plan
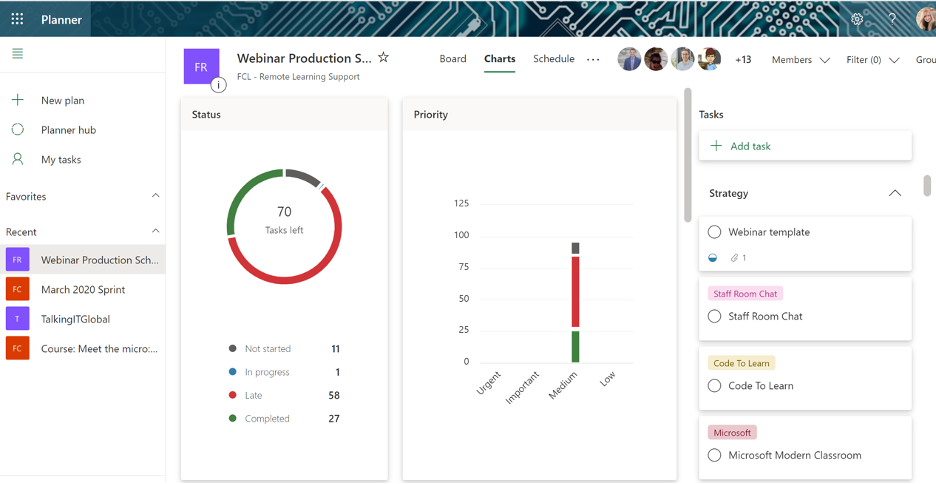
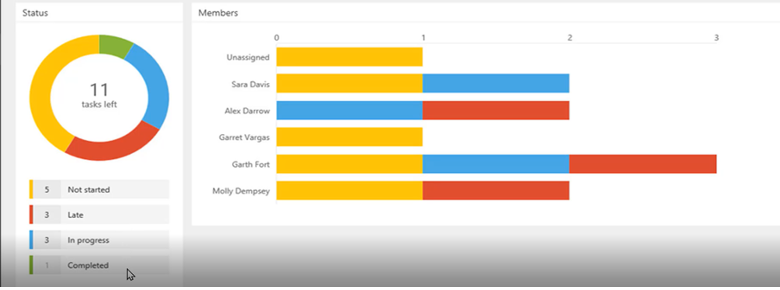
Click the “Charts” and “Schedule” tabs to visualize your plan. Planner automatically visualizes task status into pie and bar charts for you with no setup required. Planner is part of Microsoft 365, so it’s just as secure as other apps in the suite. Microsoft 365 also connects Planner with Teams (add a tab), To Do, SharePoint, Power Automate, and more for efficient task management.


Share the following video about how to use MS Planner with your students.


